Crochet lace tape

6

Hi everyone!

Today I’m sharing a pattern that I found on YouTube, which has led me to create this lovely lace tape. It can be used for trimmings or decor and whatever else you’d like to use it for!

I thought it was a neat idea and the pattern is very easy to follow.

The pattern I used is from YouTube user, Sheruknittingcom who has loads of other lace tape patterns, which can be found here.

The tutorial I followed is in two parts. I’ve embedded the first below.

Have fun crocheting!

Heart-shaped crochet basket

4

Hi everyone!

5I’m sharing with you a pattern that I found for this very cute heart-shaped basket. The basket can be used to store small things such as rings and looks pretty on a dressing table.

For this pattern, I followed the instructions found on My Poppet’s blog who has gone through the pattern.

You can follow the pattern here.

Have fun crocheting!

Crochet pattern: T-shirt basket

photo 1

Hey everyone!

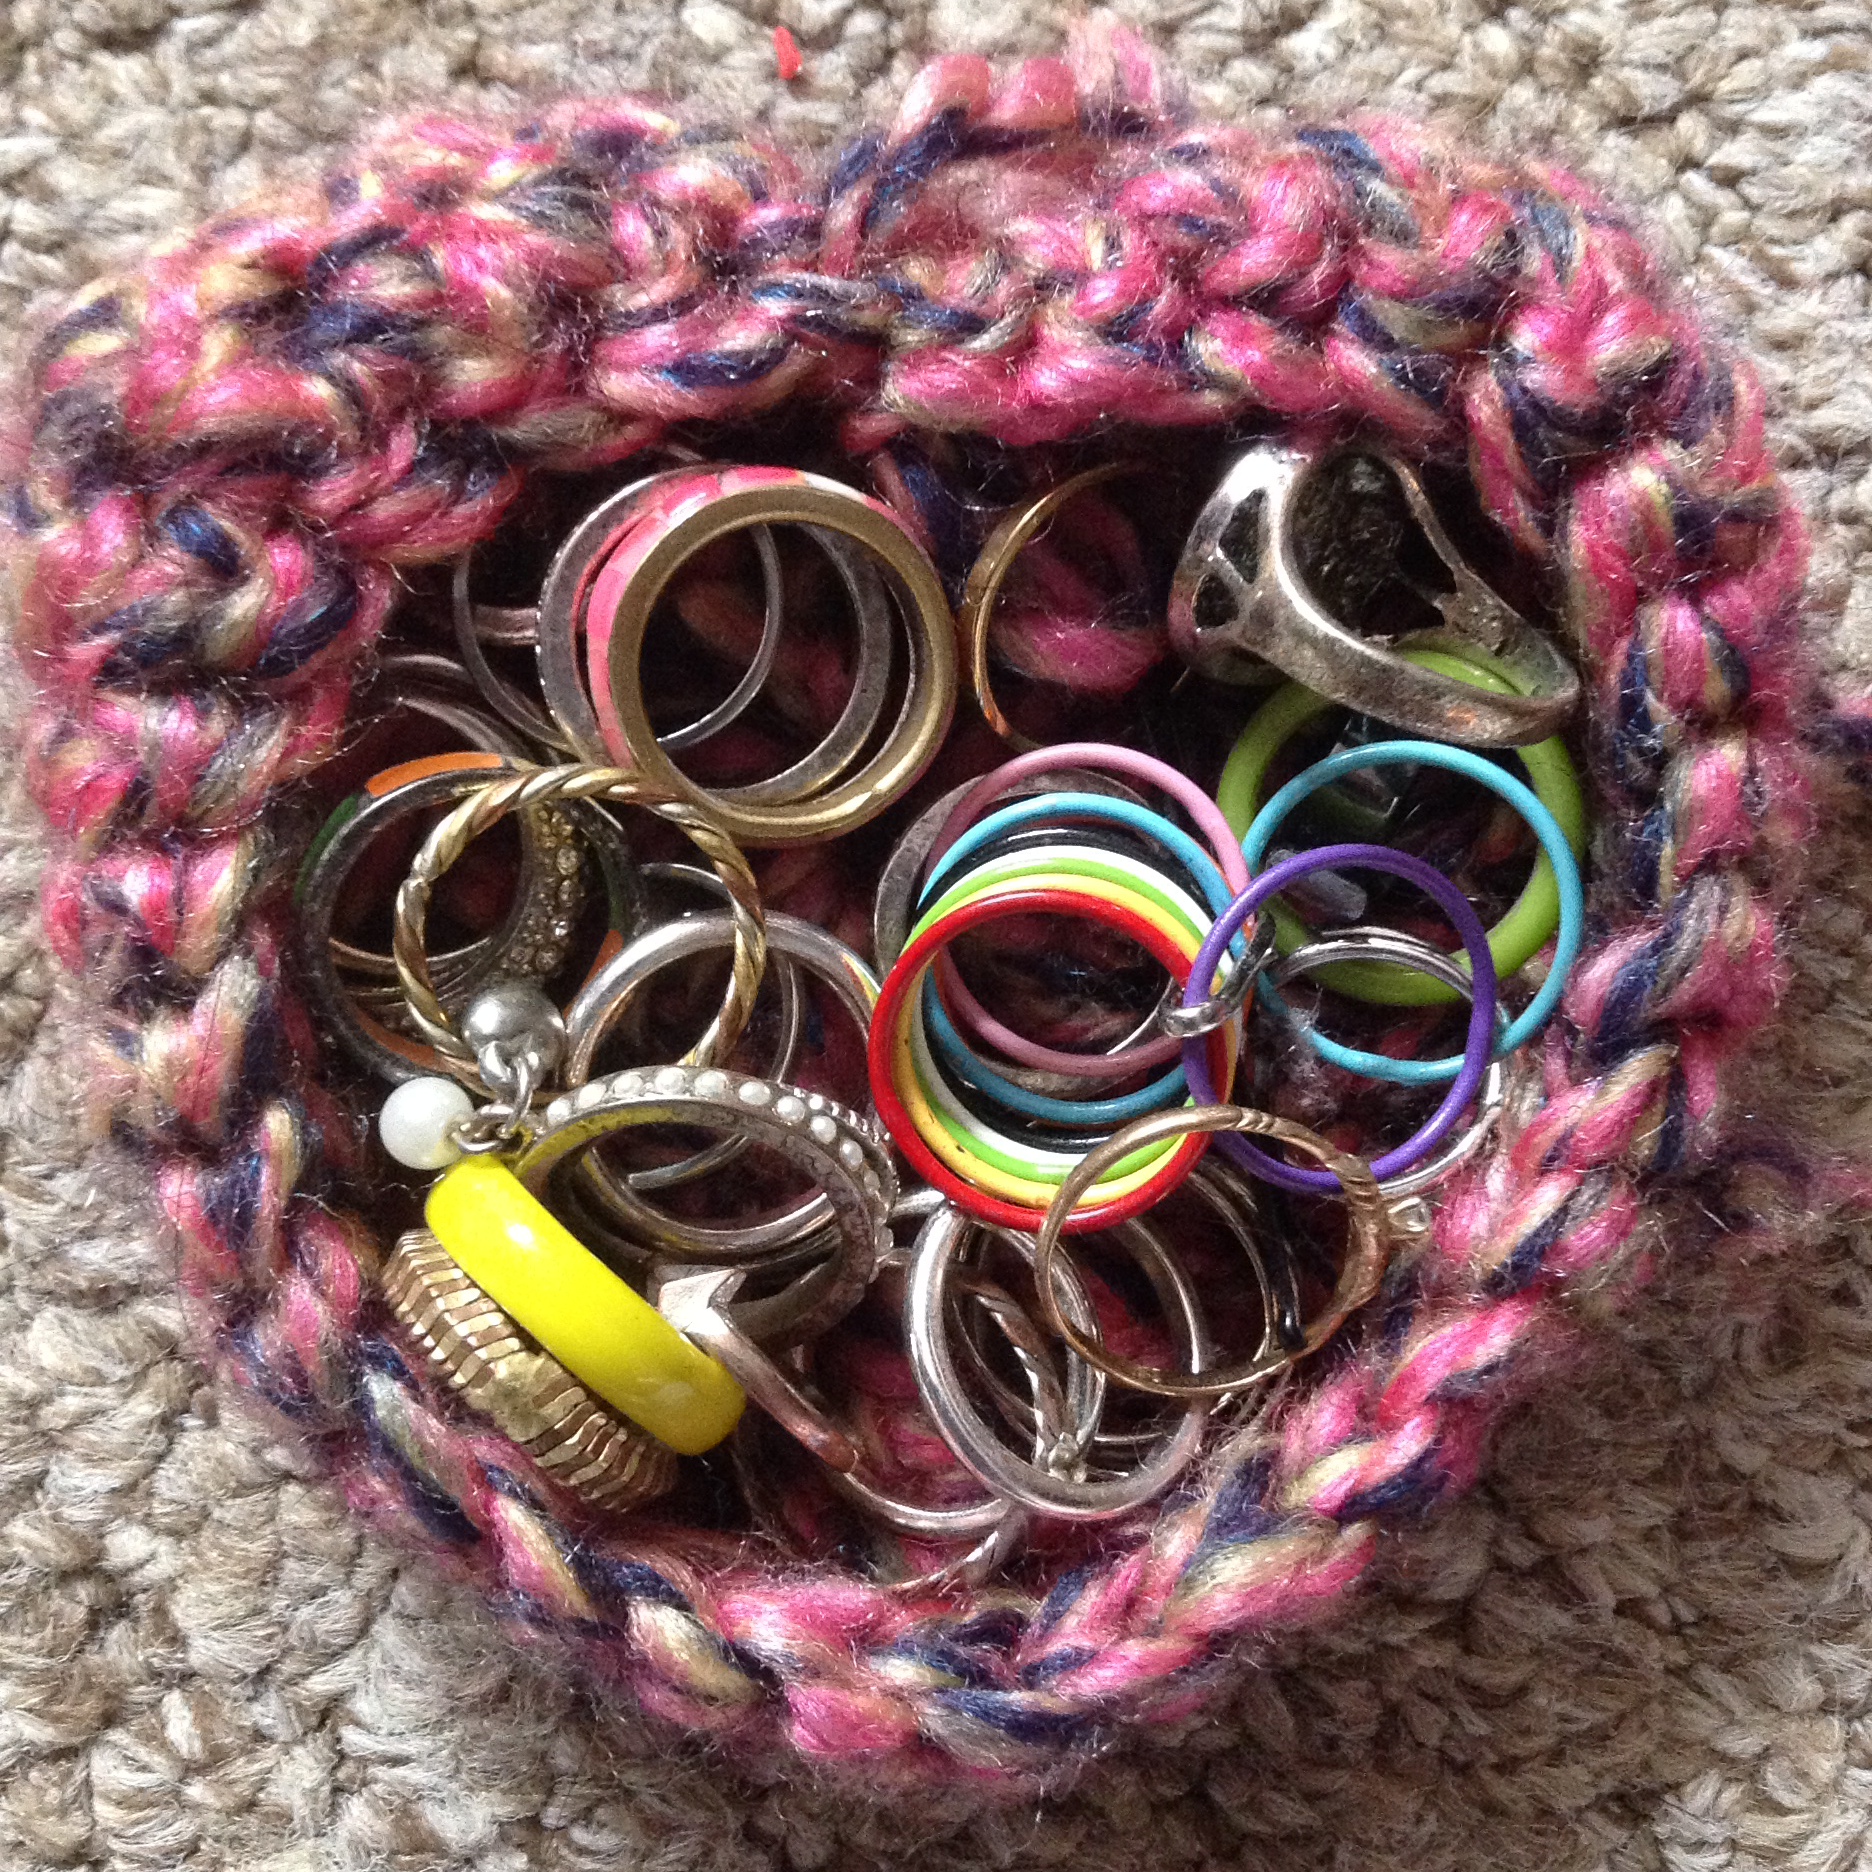
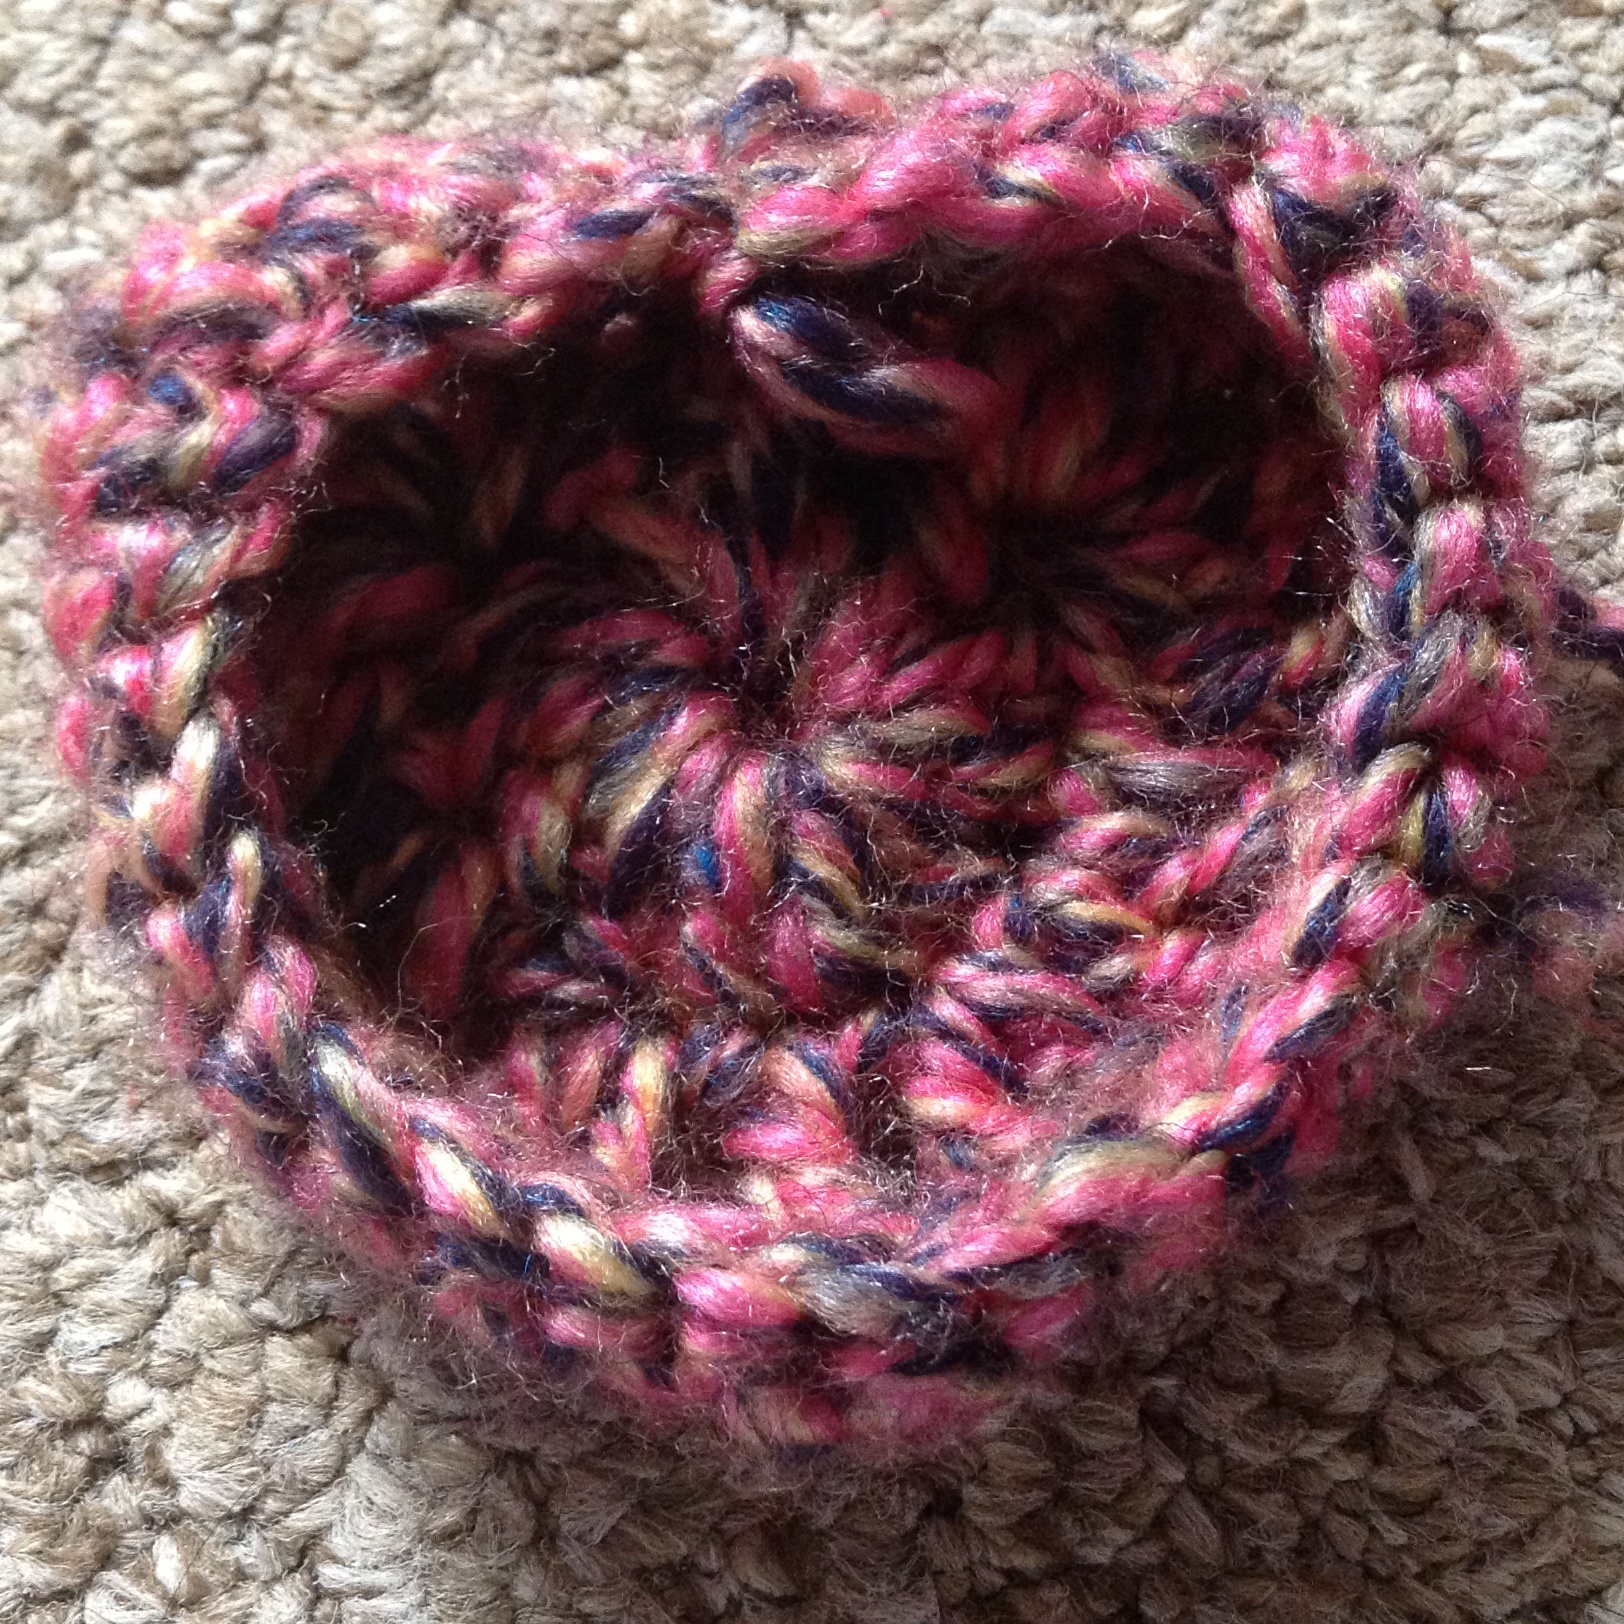
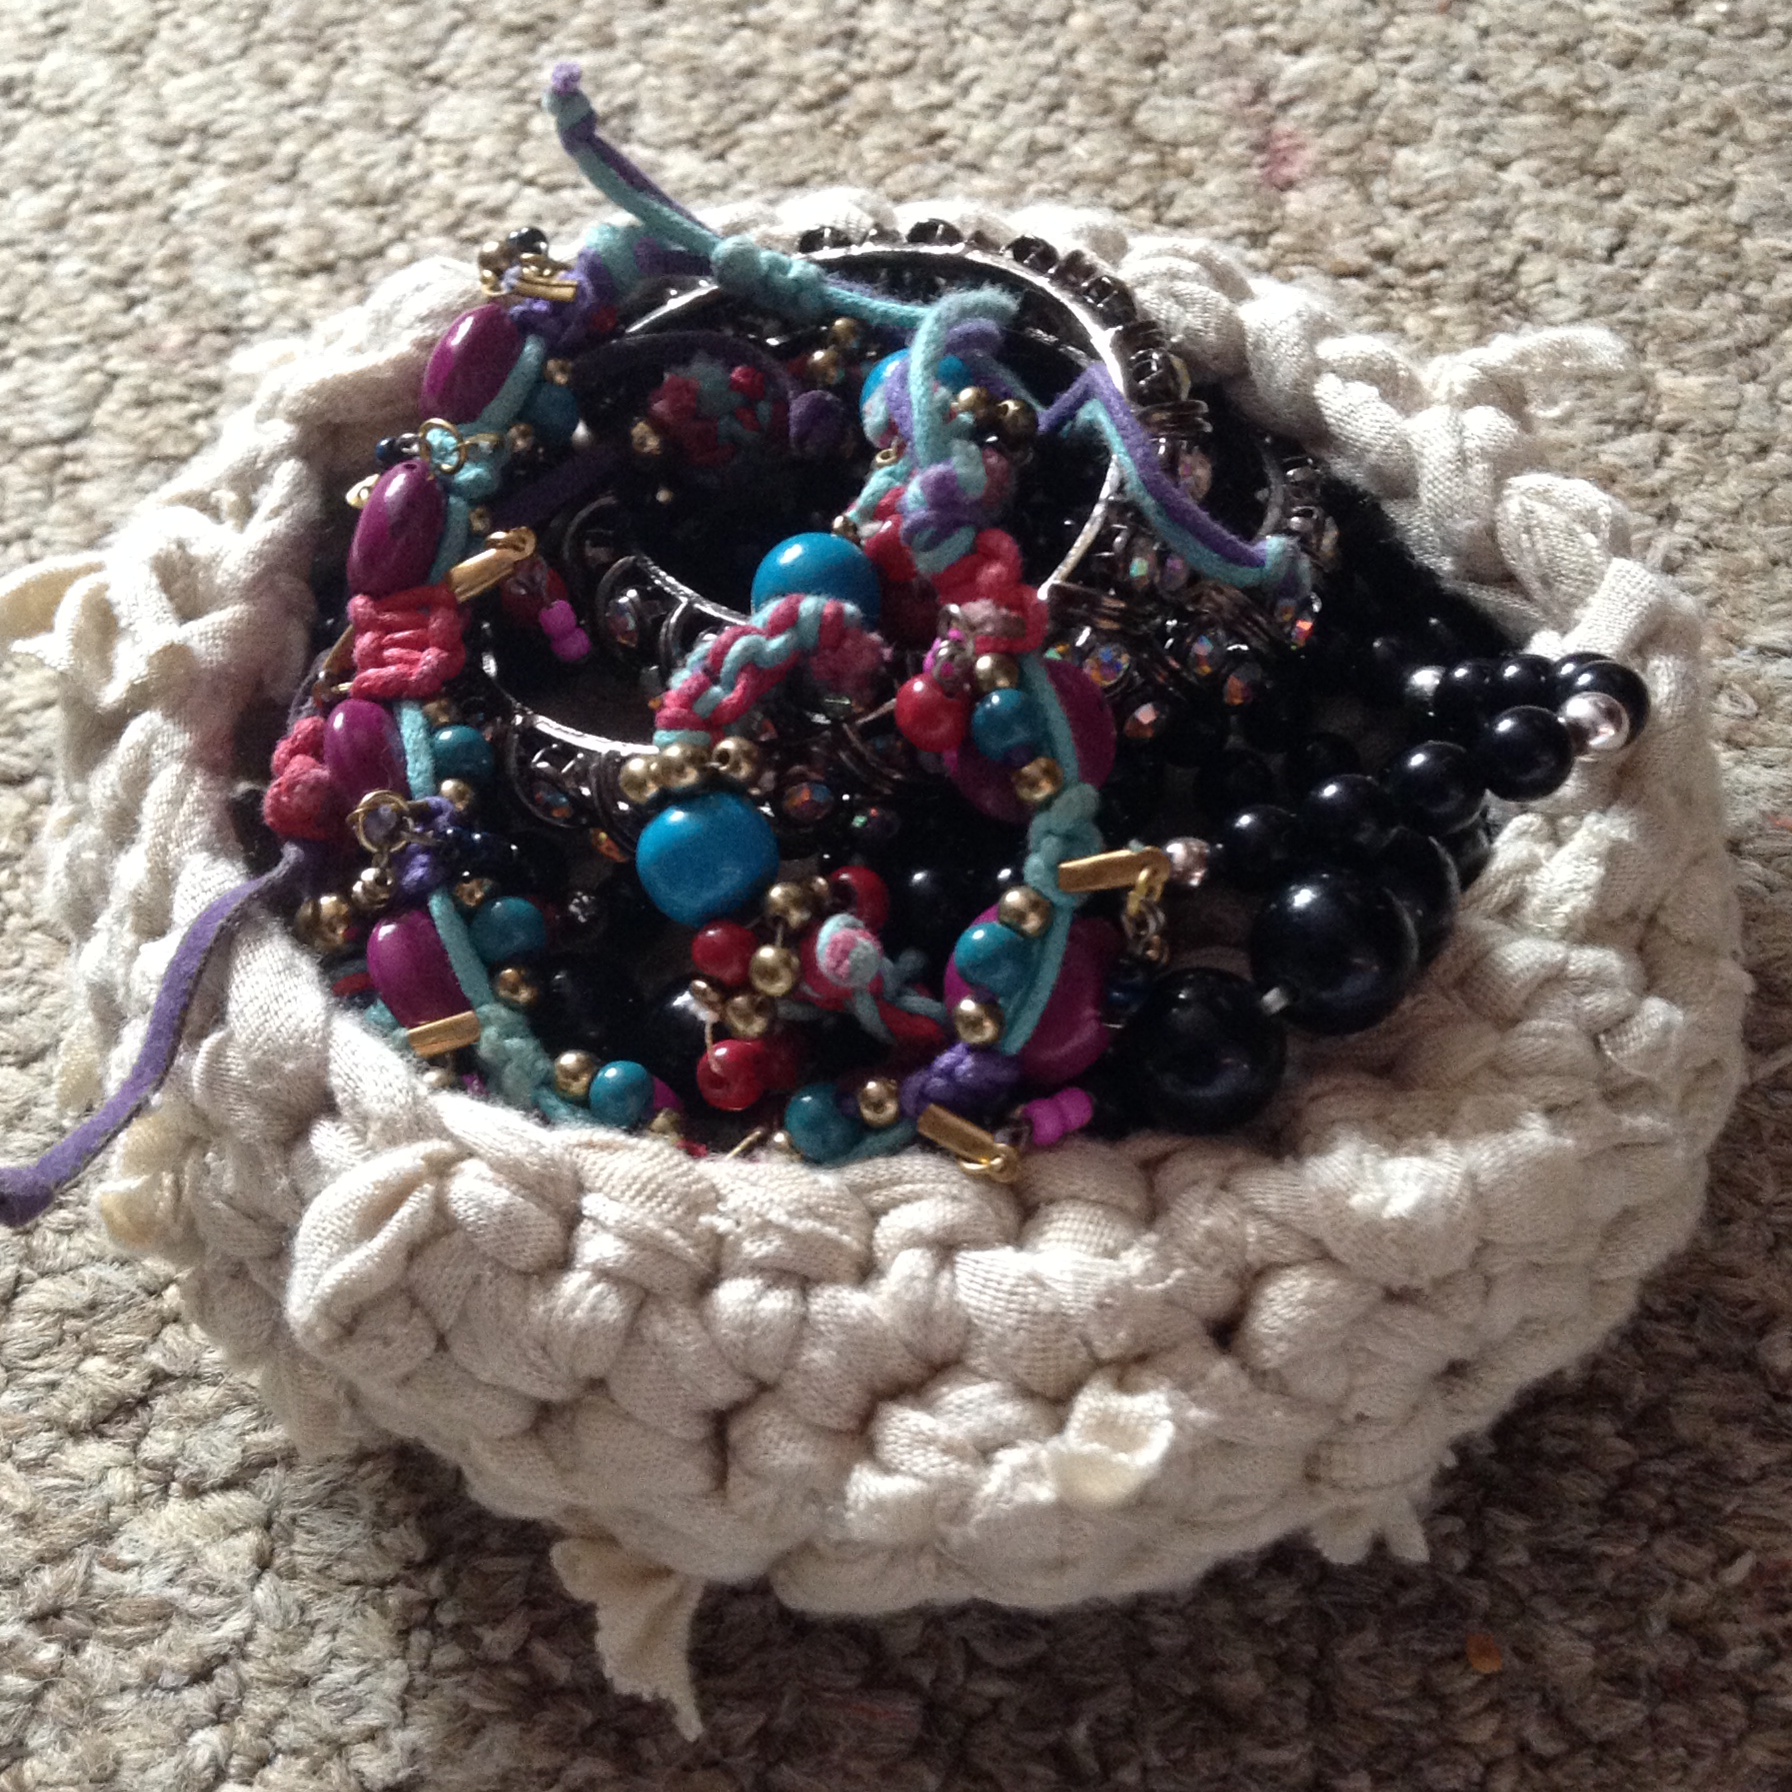
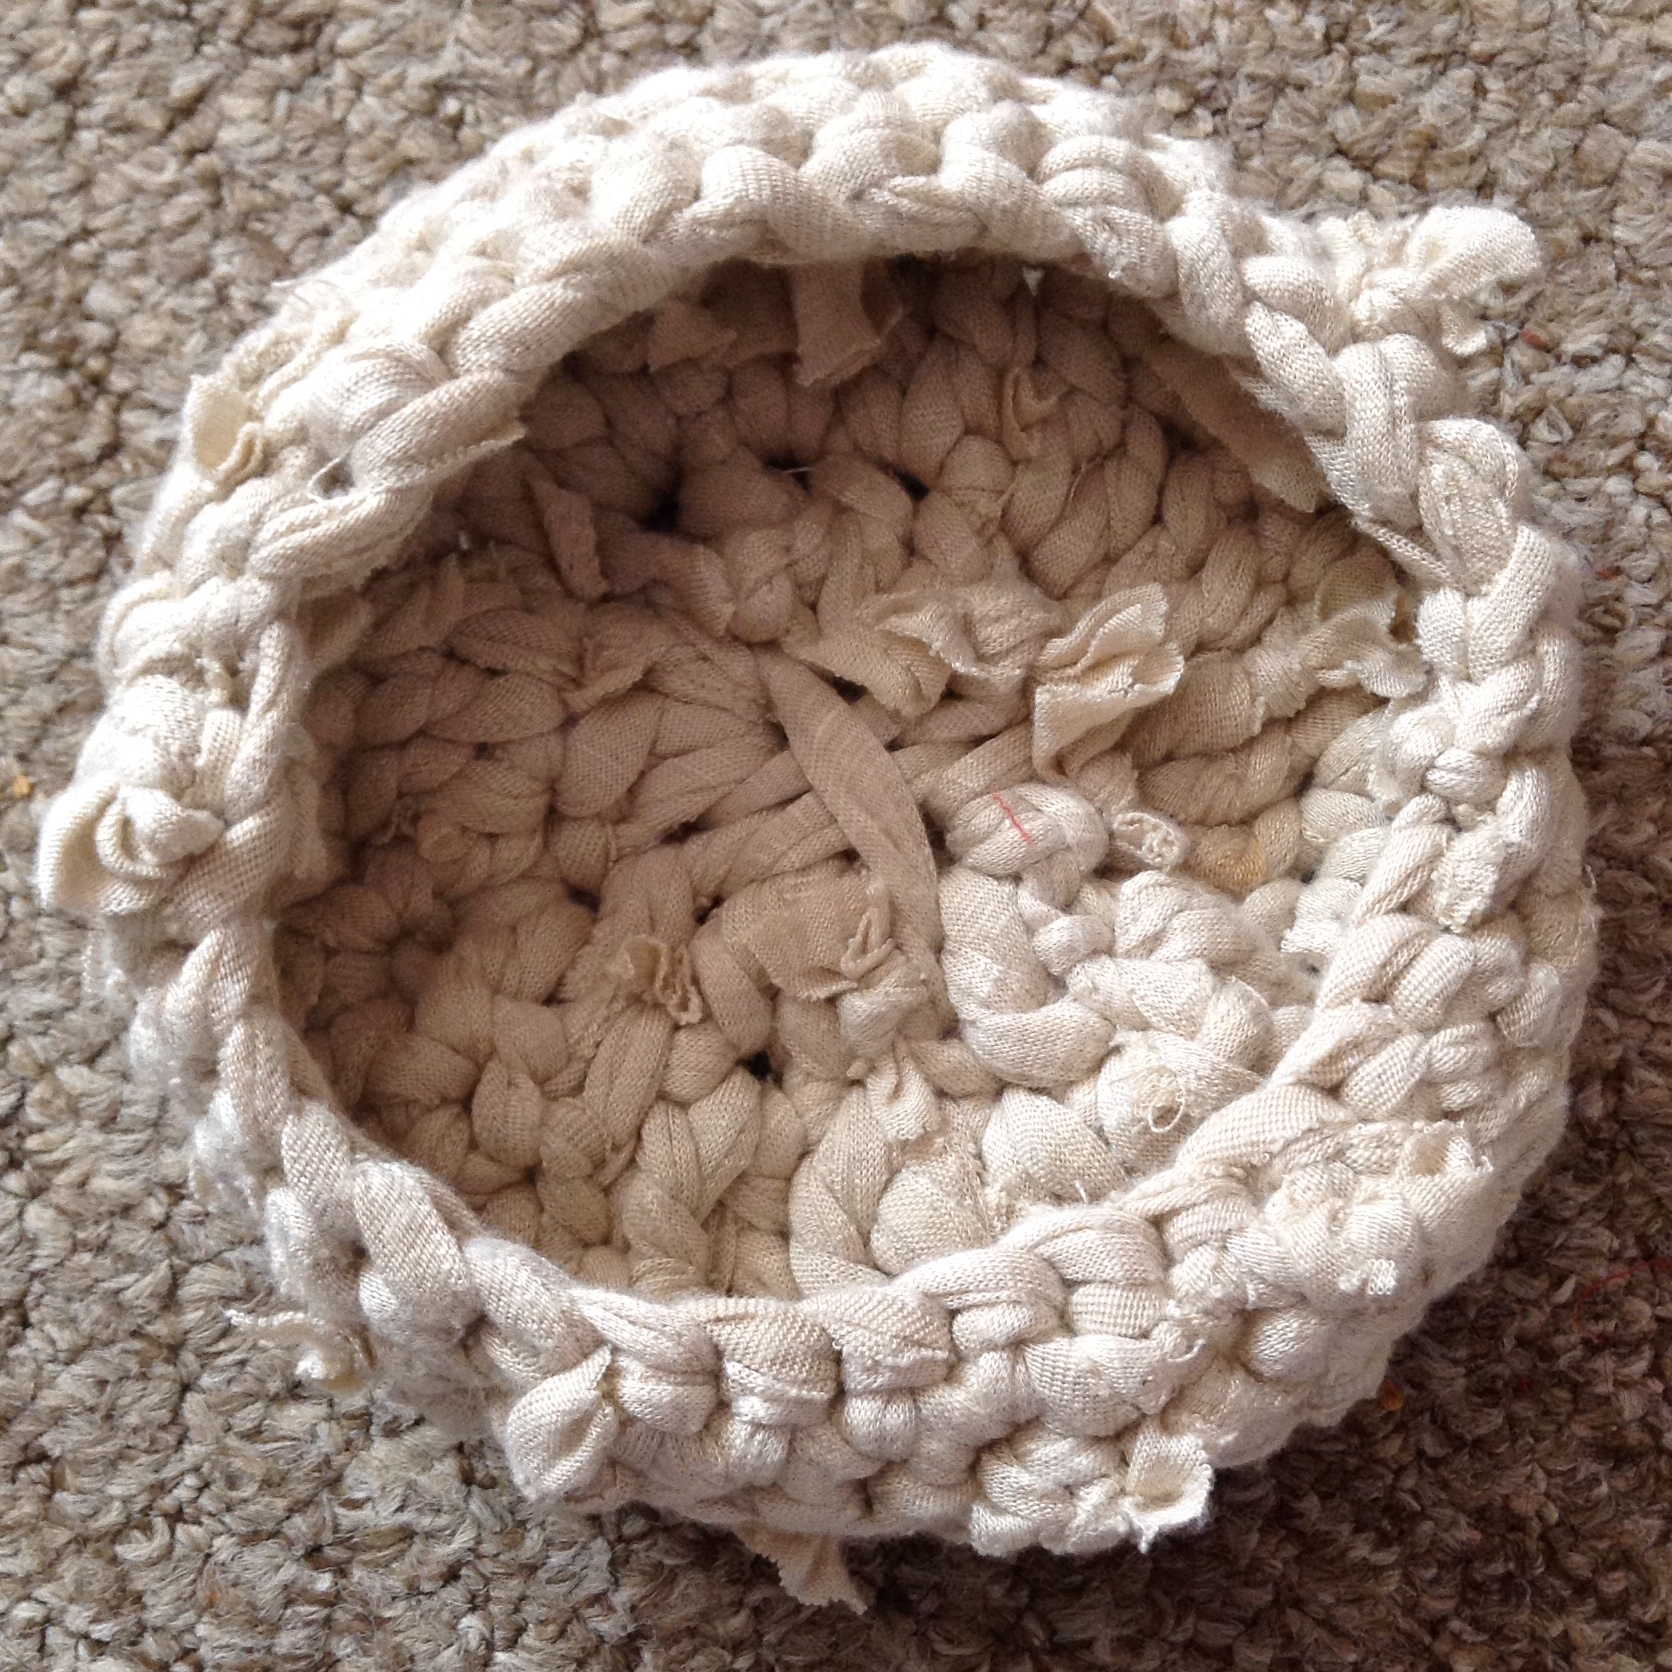
In this post I’m going to explain how I created this very cute and small basket, which is ideal for storing bits and bobs such as rings or bracelets.

First of all, the yarn that I used is one that I have made by cutting up an old cardigan. All I did was cut the cardigan into several individual strips (about 2cm in width), and attached them by knotting the ends together. By doing this, you should create a whole ball of yarn that you can knit with. The strips will tend to curl inwards, which makes it much easier to crochet with, and this is what you want to happen. There are several other ways to create this type of yarn, but I wanted the raggedy effect where the knots are visible.

I used a 5mm crochet hook. The pattern that I made up is as such:

photo 2Form a magic ring. (Learn how to make one here)

Round 1: Chain 2. Make 16 double crochets into the ring. Join with a slip stitch at the top of the chain 2.

Round 2: Chain 2. Make 2 double crochets in each stitch. You should have 32 stitches in round 2. Slip stitch in the chain from before.

Round 3: Chain 2. Make 1 double crochet in each stitch (your basket should start to curl upwards: that is what you want). Slip stitch into the chain 2 from before.

Rounds 4: Chain 1. Make 1 double crochet in each stitch. Your basket should still curl upwards to form a bowl shape. Keep repeating this if you wish, and fasten off when you’re happy with the size.

TIP: To make a basket like this, it works best when it is crocheted quite tightly because you want to have a rigid shape instead of it being loose and floppy.

Thanks for reading, and let me know how you get on in the comments!

Simple crochet doily

photo

Hi everyone! Sorry for the silence, but I’m back with this new post.

I crocheted along with this YouTuber, to make this very easy and simple doily. (I’ve never made a doily before this!) I like the way that the centre section looks like a spider web.

The video is from Crochet Jewel, who goes through all the steps in a very simple fashion. There’s three parts to the  tutorial, I’ve only embedded the first below.

Thanks for reading, and happy crocheting!

Crochet cable protector

photoHi everyone!

This post is dedicated to these protectors that are crocheted around cables. They’re VERY easy to do. All I’ve done is several double crochets around my cable until it’s all covered. I think that they’re  a great way to jazz up as well as protect your cables and earphones from breaking or ripping.

Have fun crocheting! Let me know how you do in the comments.


Crochet pattern: Step-by-step granny square

Hi everyone!

I thought that I would share a step-by-step pattern on how to crochet a very easy granny square. I am doing several small squares in this blue wool for another project that I’m working on, which I’ll definitely blog about when it is finished.

The images in the slideshow below should, hopefully, be very easy  and beginner friendly; I tried my best to explain everything in detail.

Of course, this pattern can be adjusted depending on how large you want your square. The pattern below is five squares big.

Enjoy crocheting this pattern. Let me know how your square comes out in the comments!

Hook: 4.5mm

This slideshow requires JavaScript.

IF YOU WANT TO USE MY DESIGN ON YOUR WEBSITE, PLEASE CREDIT THIS LINK.

Crochet pattern: How to make a bow

photo (8)

Hey everyone!

In this post, I will explain how to crochet a simple and cute bow. You can use these as an appliqué for a scarf or a hat.

This pattern can be adjusted for all size bows, but this is what I have done for the one shown in the picture.

Hook: 4.5mm

Step 1: Chain 12 stitches. Chain 2 more for the turning stitch.

Step 2: Do your first double crochet in the second stitch from the hook. Continue double crocheting until the end of the row.

Step 3: Chain 1 and turn. Double crochet all the way down the row.

Step 4:  Repeat step 3 until you have your desired length.

Step 5: When you get to the end, fasten off. With a knitting needle, stitch both ends of the bow together.

Step 6: Turn it inside out. For the middle of the bow, you can create a long chain (30-50 stitches, depending on what you like) and simply wrap this around the middle, covering up the sewn end.

Step 7: Fasten the middle by stitching it onto the bow. You should now have your cute bow!

Enjoy crocheting! Tell me how your bow came out in the comments!

IF YOU WANT TO USE MY DESIGN ON YOUR WEBSITE, PLEASE CREDIT THIS LINK.

Crochet pattern step-by-step: small heart

photo (7)

Hi everyone!

The step-by-step tutorial below will show you how crochet a small heart. It’s great addition to pretty much anything; hat, scarf, bag, ect…

The instructions are beginner friendly so they should be pretty simple to follow.

Have fun crocheting! Let me know what you think in the comments!

This slideshow requires JavaScript.

IF YOU WANT TO USE MY DESIGN ON YOUR WEBSITE, PLEASE CREDIT THIS LINK.

Cute crochet collar

photo (1)

DSC05464 copy

Hi everyone!

I’ve  created this cute crochet collar using a simple pattern that I found online. It’s a nice colour wool, which goes with almost any piece of clothing; perhaps a nice plain dress.

The pattern can be found on this blog by LuluLoves. It’s quite an easy pattern to crochet along to; my one came out slightly differently.

The pattern can be found here.

Have fun crocheting!

Crochet book and iPad cover

photo (2)

Hey everyone!

For this post, I’m going to explain how I made these covers to protect your books, an iPad or a Kindle. They’re practical to protect your book and devices when they are in your bag,  which is why I made two different ones.

They were very easy to make; I used a treble crochet stitch to get that lovely hole pattern, which is what I was going for.

The pattern is very simple. All you have  to do is crochet a strip which must fit the width of your book and should eventually wrap all the way around. When you’ve done that, close the stitch and with a knitting needle, simply stitch the sides together to form a pouch.

Turn the pouch inside out and begin working on the lid from the back side of your cover. You can use the same colour or a different one, but all you have to do is make sure that this strip covers the top of your book. You can make it as long as you like and can add a button or a fastener so you can close it.

There you go! Now you have a lovely pouch to protect your books.

IF YOU WANT TO USE MY DESIGN ON YOUR WEBSITE, PLEASE CREDIT THIS LINK.